Wi-Fi interface profiles
⚠ IMPORTANT:
The Wi-Fi profiles are only valid and processed by the device if the Virtual Ethernet-Wi-Fi Brigde isDISABLE .
🎯 TIP :
It isHIGHLY recommended to only use one Wi-Fi interface profile as deep network technology knowledge is required to configure multiple profiles.

General Wi-Fi preferences
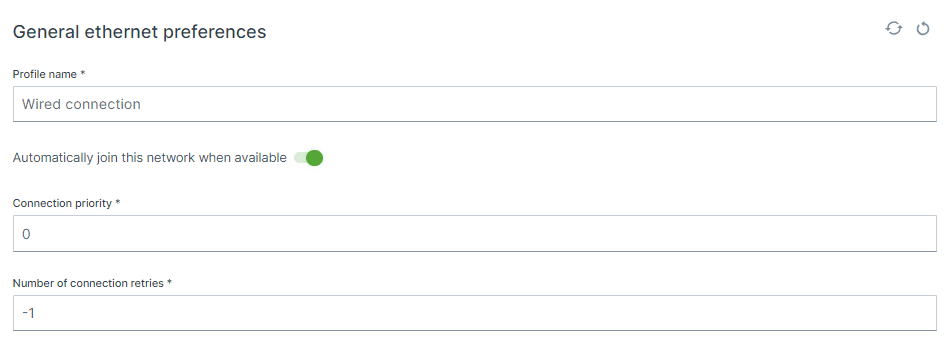
Profile name
default: Wireless connection
Automatically join this network when available
Connection Priority
Range: 0 .. 1000default: 0
Number of connection retries
default: -1
Operating mode & Security
Hotspot configuration
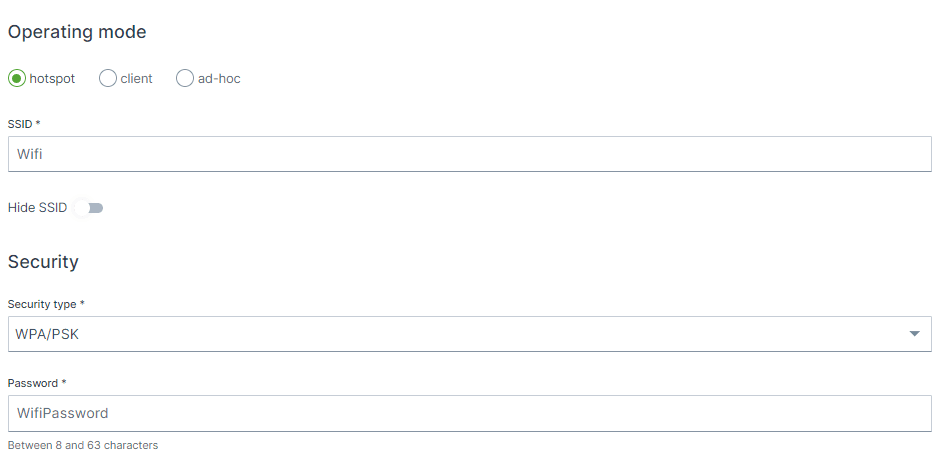
SSID
default: CR3171_<<LAST 4 DIGITS OF MACLAN_MAC>>
Hide SSID
default: OFF
Security
Options:
unencrypted, No further setting required WPA/PSK,a password will be required SAE,a password will be required OWE,No further settings required WPA/EAP,Some more settings are required, see description below.
🎯 TIP :
More information what the options means is described below.
🎯 TIP :
More information about the various security types:
WPA/PSK: Wikipedia - WPA terminology
OWE: Wikipedia - Opportunistic Wireless Encryption
SAE: Wikipedia - Simultaneous Authentication of Equals
WPA/EAP: Wikipedia - Extensible Authentication Protocol
Password
WPA/PSK Pre-Shared Key
SAE
default: <empty>
WPA/EAP
WPA/EAP
Username
WPA/EAP EAP
default: <empty>
Password
WPA/EAP EAP
default: <empty>
Anonymous identity
WPA/EAP EAP
default: <empty>
Domain
WPA/EAP EAP
default: <empty>
CA Certificate
WPA/EAP EAP
default: <empty>
Client configuration
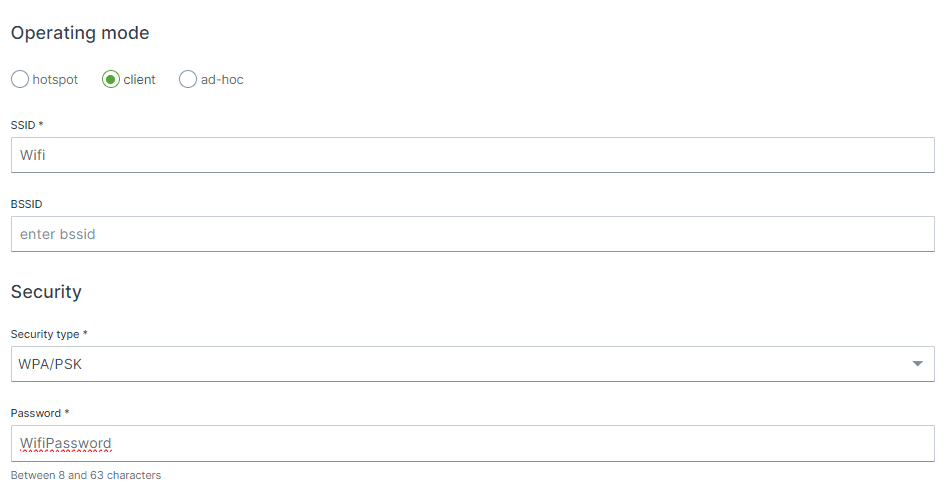
The following settings are available setting up a Wi-Fi client:
SSID
default: CR3171_<<LAST 4 DIGITS OF MACLAN_MAC>>
BSSID
default: <empty>
Security
Options:
unencrypted, No further setting required WPA/PSK,a password will be required SAE,a password will be required OWE,No further settings required WPA/EAP,Some more settings are required, see description below.
🎯 TIP :
More information what the options means is described below.
🎯 TIP :
More information about the various security types:
WPA/PSK: Wikipedia - WPA terminology
OWE: Wikipedia - Opportunistic Wireless Encryption
SAE: Wikipedia - Simultaneous Authentication of Equals
WPA/EAP: Wikipedia - Extensible Authentication Protocol
Password
WPA/PSK Pre-Shared Key
SAE
default: <empty>
WPA/EAP
WPA/EAP
Username
WPA/EAP EAP
default: <empty>
Password
WPA/EAP EAP
default: <empty>
Anonymous identity
WPA/EAP EAP
default: <empty>
Domain
WPA/EAP EAP
default: <empty>
CA Certificate
WPA/EAP EAP
default: <empty>
Ad-hoc configuration
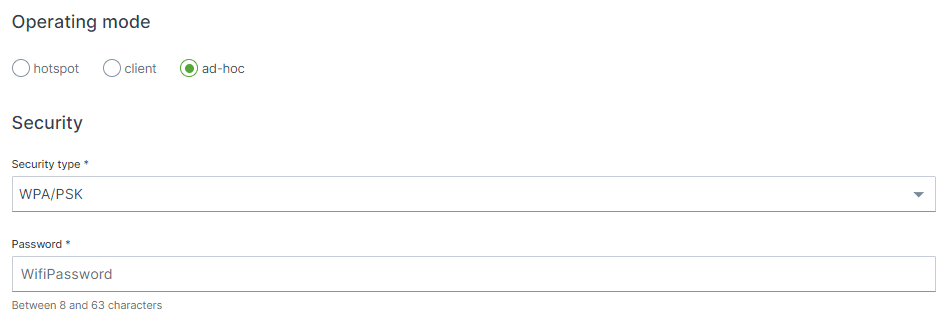
Security
Options:
unencrypted,No further setting required WPA/PSK,a password will be required SAE,a password will be required OWE,No further settings required WPA/EAP,Some more settings are required, see description below.
🎯 TIP :
More information what the options means is described below.
🎯 TIP :
More information about the various security types:
WPA/PSK: Wikipedia - WPA terminology
OWE: Wikipedia - Opportunistic Wireless Encryption
SAE: Wikipedia - Simultaneous Authentication of Equals
WPA/EAP: Wikipedia - Extensible Authentication Protocol
Password
WPA/PSK Pre-Shared Key
SAE
default: <empty>
WPA/EAP
WPA/EAP
Username
WPA/EAP EAP
default: <empty>
Password
WPA/EAP EAP
default: <empty>
Anonymous identity
WPA/EAP EAP
default: <empty>
Domain
WPA/EAP EAP
default: <empty>
CA Certificate
WPA/EAP EAP
default: <empty>
Band and IP configuration method
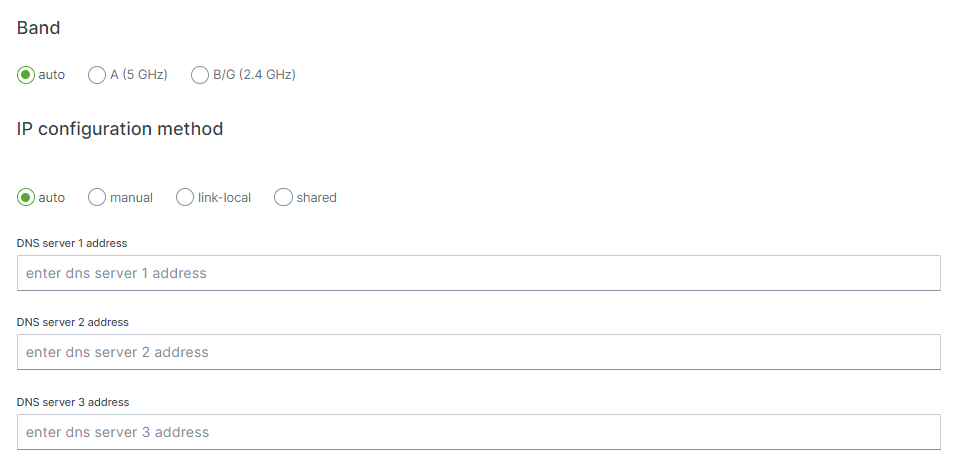
Band
Options:
auto,
A (5 GHz),
B/G (2.4 GHz)
Channel
Options:
Band B/G: 1 - 14
Band A:As this is regional depended, please visit Wikipedia to select the right channel within your region.
IP configuration method

Options:
Options:
auto,the interface will be configured as DHCP client and therefore will be assigned a IP address from an external DHCP router. No IPv4 address has to be configured. manual,In manual mode, the IPv4 Address defines the network and mask, the device IP is set through IPv4 Gateway.. link-local,a link-local address is a network address that is valid only for communications on a local link, i.e. within a subnetwork that a host is connected to. IPv4 link-local unicast addresses are assigned from address block 169.254.0.0/16( 169.254.0.0 through 169.254.255.255). shared,In shared or DHCP mode, the device's Network Manager sets up the DHCP server to manage IP addresses. It reserves 10% of the total range (up to 8 addresses) for devices that need fixed IPs, while the rest of the addresses are automatically assigned to devices as needed. Below this is explained through examples.
IPv4 Address
192.168.82.1/24 192.168.82.0 192.168.82.1 - 192.168.82.255
🎯 Tip: As security measure it is advisable to tighten the allowed IPs on the network as possible, for instance to use /29or 255.255.255.248subnet to only allow 6 address on the network, as 192.168.82.0is the network address and 192.168.82.7is the broadcast address and 192.168.82.1 - 192.168.82.6remains available.
Example - default setting
192.168.82.1/24
Network = 192.168.82.0/24
Host = 192.168.82.1
Static IP range = 192.168.82.2 - 192.168.82.10
Dynamic IP range = 192.168.82.11 - 192.168.82.254
Broadcast IP = 192.168.82.255
Example 2 - Ready for controller and display & secure
192.168.82.247 192.168.82.245
192.168.82.240/29
Network = 192.168.82.240/29Host = 192.168.82.241Static IP range = None as only 6 addresses are available (6/10) = 0 Dynamic IP range = 192.168.82.242 - 192.168.82.246Broadcast IP = 192.168.82.247
⚠ The Broadcast IP unfortunately collides with the IP address of the controller, for this there are two solutions:
more secure: change the (static) IP address of the controller and keep the pool of 6 available IPs. no change needed: set the subnet mask to /28instead of /29, this will the increase the available IP range from 6 to 14, which is less secure but no change is needed of the controller IP address.
Example 3 - higher host IP, lower half of range
192.168.82.100/24
Network = 192.168.82.0/24Host = 192.168.82.100Static IP range = 192.168.82.101 - 192.168.82.108, but also 192.168.82.1 - 192.168.82.100Dynamic IP range = 192.168.82.109 - 192.168.82.254Broadcast IP = 192.168.82.255
Example 4 - higher host IP, upper half of range
192.168.82.200/24
Network = 192.168.82.0/24Host = 192.168.82.200Static IP range = 192.168.82.192 - 192.168.82.200, but also 192.168.82.201 - 192.168.82.254Dynamic IP range = 192.168.82.1 - 192.168.82.191Broadcast IP = 192.168.82.255